
Your time is precious, and technology changes fast. Knowing which technologies are relevant means you can focus on the skills that will benefit your career the most.Click here for a free report
If you don’t know what Twitter Bootstrap is, you should check it out. Basically the idea is taking a bunch of commonly used web elements that you would usually code and having them already set up for you. Things like buttons, forms, and other things you would normally code already set up.
I know what you’re thinking “Just like the toolbox?” yes but Twitter Bootstrap goes even farther, and can provide even more valuable tools for your site such as layouts and widgets. The idea is to get you to spend less time on trivial elements and more time actually building your site.
I decided to see how hard it would be to integrate something like Twitter Bootstrap into a basic ASP.Net site, with master pages. Let’s see how it works.
Create a New Project
So I open up Visual Studio and select Start –> New Project and select “ASP.NET Empty Web Application”

I named mine “BootstrapASP” and click ok.
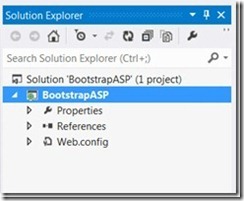
Your project looks, well, pretty empty, here is what you’ll have:
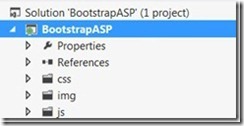
Which is pretty plain. Let’s create a folder structure that looks like this:
Get Twitter Bootstrap
Head on over to the Twitter Bootstrap github and download the bootstrap archive into a folder on your hard drive.
It should look like this:
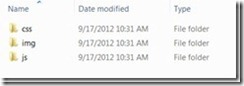
Pretty self explanatory.
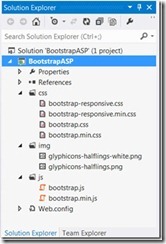
Import all these files into your project. If you don’t know how to do that, right click on the css folder and select add –> Existing Item. Then browse the folder where you unzipped the Twitter bootstrap and select all the files in the CSS folder. Do this with the img and js folders as well, and make sure to keep this structure intact.
Your structure should now look like this:
You’re almost ready. for this tutorial we’re going to use normalize.css you can download it here and import it into your project. This will keep the layout more consistent and is a good alternative to reset tags.
Create Your Master Page
For this site we are going to want to use a master page, so we can have a common header and footer throughout the site.
Right click on the BootstrapASP folder and select Add –> New Item
In the dialog that pops up select Master Page and name it “BootstrapASP.Master”
Open the BootstrapASP.Master file.
Here you will find the following code:
<%@ Master Language="C#" AutoEventWireup="true" CodeBehind="BootstrapASP.master.cs" Inherits="BootstrapASP.BootstrapASP" %>

<!DOCTYPE html>

<html xmlns="http://www.w3.org/1999/xhtml">
<head runat="server">
    <title></title>
    <asp:ContentPlaceHolder ID="head" runat="server">
    </asp:ContentPlaceHolder>
</head>
<body>
    <form id="form1" runat="server">
    <div>
        <asp:ContentPlaceHolder ID="ContentPlaceHolder1" runat="server">

        </asp:ContentPlaceHolder>
    </div>
    </form>
</body>
</html>
This is pretty much your standard html page, but we’re going to make a few additions to it.
On the line after the <title></title> tags add the following lines:
<link type="text/css" rel="stylesheet" href="css/bootstrap.css" />
<link type="text/css" rel="stylesheet" href="css/normalize.css" />
Then at the bottom of the page, right before the </body> tag, add the following two lines:
<script type="text/javascript"  src='<% ResolveUrl ("~/Js/jquery-1.2.3.min.js") %>'></script>

<script src="js/bootstrap.min.js"></script>
Then add a method to your master page code behind. (Open up BootstrapASP.Master.cs)
Add the following method:
protected override void OnLoad(EventArgs e)
    {
        base.OnLoad(e);
        Page.Header.DataBind();
    }
What is this “ResolveUrl” Method?
Often times when you use jQuery on an ASP site with Master Pages you get JS runtime error because the path of the page you are on may be different from the one that was present when jQuery was loaded. This solution by Waleed Mohamed solves the JavaScript inside Master Pages problem.
Set up the Master Page
Twitter Bootstrap contains some features to layout your page, we’ll do something very basic with it today.
In the web form of your master page, insert the following code:
<div>
        <div class="container">
            <div class="row-fluid"><div class="span12"><h1>Welcome to our Website</h1></div></div>
            <div class="row-fluid">
              <div class="span2">
              sidebar
              </div>
              <div class="span10">
                <asp:ContentPlaceHolder ID="ContentPlaceHolder1" runat="server"></asp:ContentPlaceHolder>
              </div>
            </div>
        </div>
    </div>
This creates a 2 column layout with a header. Span=12 is the full width of the page, and that’s what we want our header to do. Span 2 is the sidebar, which is of course much smaller than span 10 which is our content.
We’ll do more with this page in a minute.
| Are you an IIS Administrator? Do you want to be? Check out my new IIS Administration Fundamentals course at Pluralsight! – J |
Create Your Index Page
Add –> New Item
In the next dialog Select “Web form using Master Page”
Name it Default.aspx
Select a Master Page –> BootstrapASP.master
Modify Index Page
Open up Default.aspx and you’ll see there isn’t much there. However there is a content holder with an of “ContentPlaceHolder1” and that’s where your dynamic text will go. Note: If you’re unsure about how Master Pages work that’s ok, it’s not complicated. You should read up on it so you can better understand what’s going on here though.
Lets throw in a hello world and press play (F5)
This is your basic page. Let’s throw in some random elements in there for fun.
Add Some Style to Master Page
Open up the Master Page again (BootstrapASP.Master.cs) and add the following inside the “span2” div
<ul>
       <li>Home</li>
       <li>Schedule an appointment</li>
       <li>Contact us</li>
       <li>About Us</li>
       <li>Follow us on Twitter</li>
</ul>
This will be the side menu that sits on the left.
Add –> New Item
In the next dialog Select “Style Sheet”
save as “ourstyle.css”
Now add
<link type="text/css" rel="stylesheet" href="/css/ourstyle.css" />to your master page. We’re going to extend some of these styles.
Open up ourstyle.css and put in the following code:
#topheader
{
    background-color: #0094ff;
    color: white;
}
#sidebar
{
    background-color: #999999;
    min-height: 600px;
}
#footer
{
    background-color: #b200ff;
    text-align: center;
}
Save the file.
Now go back to your Master Page and make the following modifications:
change the top 12 span:
<div class="span12”>

to

<div class="span12" id="topheader">

and

<div class="span2">

to

<div class="span2" id="sidebar">

and ( lower 12 span)

<div class="span12">

to

<div class="span12" id="footer">
This puts IDs on the layout elements.
Finished Master Page Code (within the form)
<div>
<div class="container">
<div class="row-fluid"><div class="span12" id="topheader"><h1>Welcome to our Website</h1></div></div>
<div class="row-fluid">
<div class="span2" id="sidebar">
<ul>
<li>Home</li>
<li>Schedule an appointment</li>
<li>Contact us</li>
<li>About Us</li>
<li>Follow us on Twitter</li>
</ul>
</div>
<div class="span10">
<asp:ContentPlaceHolder ID="ContentPlaceHolder1" runat="server"></asp:ContentPlaceHolder>
</div>
</div>
<div class="row-fluid"><div class="span12" id="footer">© 2012 Your Company</div></div>
</div>
</div>This gets your Master Page styled up and ready. Though I admit it looks horrible it gives you a general idea of how Twitter bootstrap can help you with layouts.
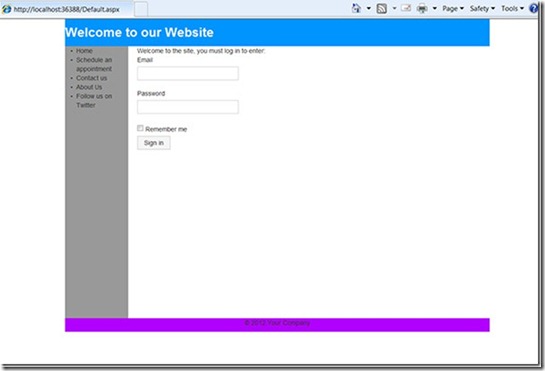
Last Step: Open Your Index Page (Default.aspx) again
Open up your Default.aspx site again and add some code after the tag: <asp:Content ID=”Content2″ ContentPlaceHolderID=”ContentPlaceHolder1″ runat=”server”>
<p>Welcome to the site, you must log in to enter</p>

   <div class="control-group">
   <label class="control-label" for="inputEmail">Email</label>
   <div class="controls">
     <input type="text" id="inputEmail" placeholder="Email">
   </div>
</div>
<div class="control-group">
   <label class="control-label" for="inputPassword">Password</label>
   <div class="controls">
     <input type="password" id="inputPassword" placeholder="Password">
   </div>
</div>
<div class="control-group">
   <div class="controls">
     <label class="checkbox">
       <input type="checkbox"> Remember me
     </label>
     <button type="submit" class="btn">Sign in</button>
   </div>
</div>
This is not a functional form, but I wanted to throw a few things on there so you can see what types of things are included in the Twitter Bootstrap kit.
Now press play (F5) and it should look something like this:
As you may know, master pages work as a templating system where the inner content changes, but the headers and menus stay the same. You can test this out by creating new pages using the master page you just created.
Select Add –> New Item –> Web Form From Master Page and select the Master Page you just created, and save the file as something else.
I hope this has helped those folks out there who want to utilize Twitter Bootstrap with their ASP pages.
Thanks for reading!
– Jeremy
About the Author
Jeremy Morgan is a software engineer with over a decade of experience as a polyglot coder, dabbling in both LAMP and .Net worlds equally. He enjoys creating tutorials for new programmers in the hopes it will encourage more people to join this exciting hobby. Check out his programming blog here or say hi on Google+ sometime.

